今年墙又升级了,很多SS/SSR用户的VPS IP都被封了,要么就是VPS的端口被秒封,本文介绍下V2ray使用WebSocket+TLS+Nginx来实现科学上网的方法,虽然配置比较麻烦,但是稳定性好,不容易被干扰,也不容易被墙。总是受VPS IP被墙这个问题困恼的朋友可以试试。
一、准备工作
首先要有一台国外VPS,这里推荐使用搬瓦工,年付$49.99起,还有CN2 GIA-E(年付$119起),支持支付宝,详细可以参考一些便宜性价比高的VPS推荐(搬瓦工VPS)。
之后需要一个域名,可以付费购买(推荐Namesilo),也可以在Freenom申请一个免费域名(申请教程),之后解析到你的VPS IP上。
二、安装V2Ray
直接使用V2Ray官方脚本即可:
- # 安装v2ray
- bash <(curl -L -s https://install.direct/go.sh) # 直接使用脚本
- service v2ray start # 启动
- vim /etc/v2ray/config.json # 修改配置文件
三、配置V2Ray服务器端
此脚本会自动安装以下文件:
- /usr/bin/v2ray/v2ray:V2Ray 程序;
- /usr/bin/v2ray/v2ctl:V2Ray 工具;
- /etc/v2ray/config.json:配置文件;
- /usr/bin/v2ray/geoip.dat:IP 数据文件
- /usr/bin/v2ray/geosite.dat:域名数据文件 此脚本会配置自动运行脚本。自动运行脚本会在系统重启之后,自动运行 V2Ray。目前自动运行脚本只支持带有 Systemd 的系统,以及 Debian / Ubuntu 全系列。
运行脚本位于系统的以下位置:
- /etc/systemd/system/v2ray.service: Systemd
- /etc/init.d/v2ray: SysV
脚本运行完成后,你需要:
编辑 /etc/v2ray/config.json 文件来配置你需要的代理方式;
运行 service v2ray start 来启动 V2Ray 进程;
之后可以使用 service v2ray start|stop|status|reload|restart|force-reload 控制 V2Ray 的运行。
编辑V2ray配置文件:
- {
- “log” : {
- “access”: “/var/log/v2ray/access.log”,
- “error”: “/var/log/v2ray/error.log”,
- “loglevel”: “warning”
- },
- “inbound”: {
- “port”: 9000, //(此端口与nginx配置相关)
- “listen”: “127.0.0.1”,
- “protocol”: “vmess”,
- “settings”: {
- “clients”: [
- {
- “id”: “eb950add-608e-409d-937f-e797324387093z”, //你的UUID, 此ID需与客户端保持一致
- “level”: 1,
- “alterId”: 64 //此ID也需与客户端保持一致
- }
- ]
- },
- “streamSettings”:{
- “network”: “ws”,
- “wsSettings”: {
- “path”: “/v2ray” //与nginx配置相关
- }
- }
- },
- “outbound”: {
- “protocol”: “freedom”,
- “settings”: {}
- },
- “outboundDetour”: [
- {
- “protocol”: “blackhole”,
- “settings”: {},
- “tag”: “blocked”
- }
- ],
- “routing”: {
- “strategy”: “rules”,
- “settings”: {
- “rules”: [
- {
- “type”: “field”,
- “ip”: [
- “0.0.0.0/8”,
- “10.0.0.0/8”,
- “100.64.0.0/10”,
- “127.0.0.0/8”,
- “169.254.0.0/16”,
- “172.16.0.0/12”,
- “192.0.0.0/24”,
- “192.0.2.0/24”,
- “192.168.0.0/16”,
- “198.18.0.0/15”,
- “198.51.100.0/24”,
- “203.0.113.0/24”,
- “::1/128”,
- “fc00::/7”,
- “fe80::/10”
- ],
- “outboundTag”: “blocked”
- }
- ]
- }
- }
- }
四、配置Nginx
Nginx安装很简单的,Google一下就有了。
另外,编辑Nginx配置文件,添加一个配置:
- server {
- # SSL configuration
- listen 443 ssl http2 default_server;
- listen [::]:443 ssl http2 default_server;
- ssl_certificate /ssl.pem; #你的ssl证书, 如果第一次,可能还需要自签一下,
- ssl_certificate_key /ssl.key; #你的ssl key
- root /var/www/html;
- # Add index.php to the list if you are using PHP
- index index.html index.htm index.nginx-debian.html;
- server_name test.v2ray.com; #你的服务器域名
- location /ray { #/ray 路径需要和v2ray服务器端,客户端保持一致
- proxy_redirect off;
- proxy_pass http://127.0.0.1:10000; #此IP地址和端口需要和v2ray服务器保持一致,
- proxy_http_version 1.1;
- proxy_set_header Upgrade $http_upgrade;
- proxy_set_header Connection “upgrade”;
- proxy_set_header Host $http_host;
- }
- }
关于域名ssl 证书,使用certbot自动签一个let’s encrypt证书就行了, 很简单,参考链接: https://certbot.eff.org/,成功后, 在crontab 中添加一条任务计划每三个月执行一次,因为let’s encrypt证书三个月过期:
- 0 0 15 */3 * /root/certbot/certbot-auto renew #在3,6,9,12月份的15号零点零分执行更新
五、配置V2Ray客户端
编辑V2Ray客户端配置文件:
- {
- “log”: {
- “loglevel”: “warning”
- },
- “inbound”: {
- “port”: 1080,
- “listen”: “127.0.0.1”,
- “protocol”: “socks”,
- “settings”: {
- “auth”: “noauth”,
- “udp”: false
- }
- },
- “inboundDetour”: [
- {
- “port”: 8123,
- “listen”: “127.0.0.1”,
- “protocol”: “http”,
- “settings”: {}
- }
- ],
- “outbound”: {
- “protocol”: “vmess”,
- “settings”: {
- “vnext”: [{
- “address”: “test.v2ray.com”, // 服务器地址,请修改为你自己的服务器 ip 或域名
- “port”: 443, // 服务器端口
- “users”: [{
- “id”: “461aad1f-687c-4188-9abc-80073a618ca3”, //你的UUID, 此ID需与服务端保持一致
- “level”: 1,
- “alterId”: 64, //此ID也需与客户端保持一致
- “security”: “aes-128-gcm”
- }]
- }]
- },
- “streamSettings”:{
- “network”: “ws”,
- “security”: “tls”,
- “tlsSettings”: {
- “serverName”: “test.v2ray.com” //此域名是你服务器的域名
- },
- “wsSettings”: {
- “path”: “/ray” //与服务器配置及nginx配置相关
- }
- },
- “tag”: “forgin”
- },
- “outboundDetour”: [
- {
- “protocol”: “freedom”,
- “settings”: {},
- “tag”: “direct”
- }
- ],
- “routing”: { //此路由配置是自动分流, 国内IP和网站直连
- “strategy”: “rules”,
- “settings”: {
- “domainStrategy”: “IPIfNonMatch”,
- “rules”: [
- {
- “type”: “chinaip”,
- “outboundTag”: “direct”
- },
- {
- “type”: “chinasites”,
- “outboundTag”: “direct”
- },
- {
- “type”: “field”,
- “ip”: [
- “0.0.0.0/8”,
- “10.0.0.0/8”,
- “100.64.0.0/10”,
- “127.0.0.0/8”,
- “169.254.0.0/16”,
- “172.16.0.0/12”,
- “192.0.0.0/24”,
- “192.0.2.0/24”,
- “192.168.0.0/16”,
- “198.18.0.0/15”,
- “198.51.100.0/24”,
- “203.0.113.0/24”,
- “::1/128”,
- “fc00::/7”,
- “fe80::/10”
- ],
- “outboundTag”: “direct”
- }
- ]
- }
- },
- “policy”: {
- “levels”: {
- “0”: {“uplinkOnly”: 0}
- }
- }
- }
或者下载Windows客户端:V2RayN
打开软件,点击:服务器→添加[VMess]服务器:
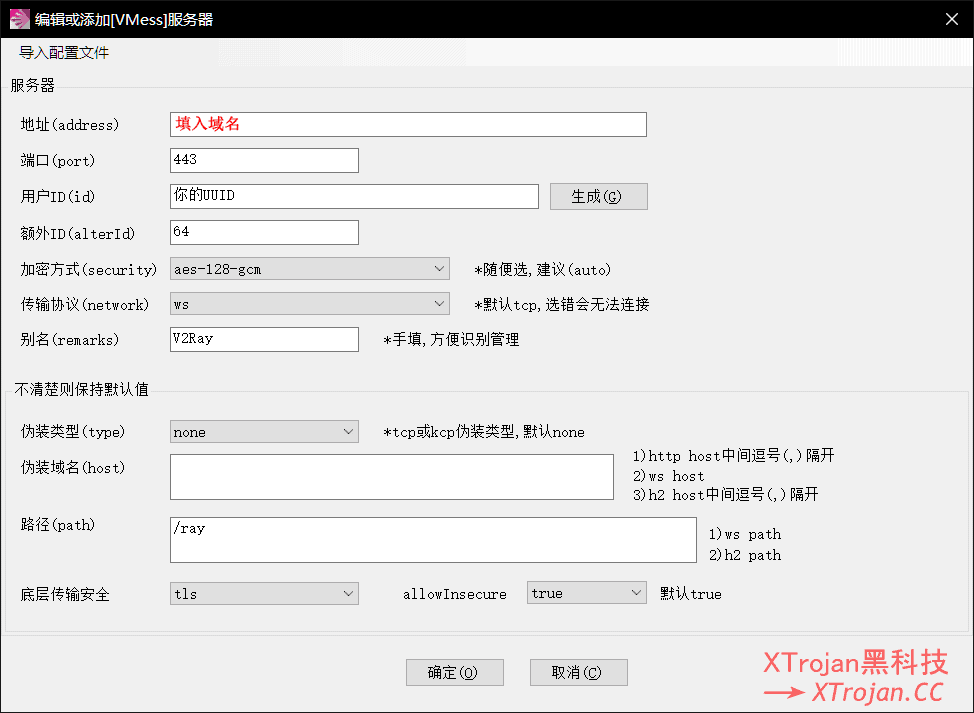
填上你设置的对应数据,如服务器ip、端口、UUID(服务端和客户端必须一致),加密方式一般为aes-128-gcm,协议为ws,伪装域名留空,路径为/ray,开启tls和不安全传输,设置完保存。
右键V2RayN的系统栏小图标,点击启用Http代理,Http代理模式选择第二个PAC模式,最后再打开V2RayN软件面板,在检查更新里选择更新PAC。
到此,V2Ray就全部配置完成了。